|
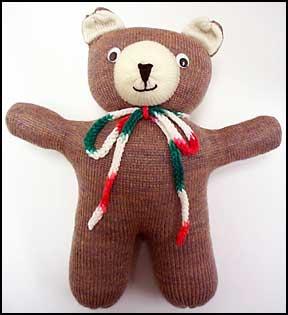
This is a quick and easy bear to knit and finish. The body is knit in one piece from his legs up over his head and back down to his legs. His nose and ears are knit separately. Go Freebies - DesignaKnit - Buster T. Bear Family to see the basic shape. If you have DAK, you can download the shape file and alter it as you wish.
Size: 8 (15, 22.4)" or 20 (38, 57) cm.
Materials: small amount of Bramwell 4-ply and machine washable stuffing. Sample was knit in Oak with a small amount of contrast.
Machine: Sample was knit on a standard gauge. A mid-gauge machine can be used with the appropriate yarn and tension and will result in larger bears.
Tension: 7.
Gauge: 7.5 sts x 10 rows per 1" (2.5 cm) although it is not important to match the gauge exactly for this project.
Note: See Freebies - DesignaKnit - Buster T. Bear Family for shape files so you can use any yarn and tension you wish or scale a shape to another size.
Body:
• Cut 3 24" (40 cm) strands of yarn before beginning.
• RC000. Weaving cast on over 14 (27, 40) sts. Knit to RC25 (49, 75). Remove the sts onto a garter bar or waste yarn.
• RC000. Weaving cast on over 14 (27, 40) sts on the left of centre 0. Knit to RC25 (49, 75). COL. Rehang the sts from the garter bar onto the needles on the right of centre 0. 28 (54, 80) sts in work.
• Knit to RC39 (79, 117). E-wrap cast on 14 (29, 44) sts at the beginning of the next 2 rows.
• RC51 (103, 153). Bind off 14 (29, 44) sts at the beginning of the next 2 rows.
• RC55 (111, 166). *Thread a needle with a strand of yarn and weave it through the sts to mark the row. This will be used to shape the bear.
• RC82 (162, 242). Repeat *.
• RC109 (213, 318). Repeat *.
• RC113 (221, 329). E-wrap cast on 14 (29, 44) sts at the beginning of the next 2 rows.
• RC123 (245, 365).Bind off 14 (29, 44) sts at the beginning of the next 2 rows.
• RC136 (274, 406). Remove the 14 (27, 40) sts left of 0 onto waste yarn.
• Knit 26 (50, 76) rows on the sts on the right. RC162 (324, 482). Thread the yarn tail through the sts to remove them from the needles.
• Rehang the sts on waste yarn and reset the RC to 136 (274, 406). Knit the second leg to match the first.
Ears:
• RC000. Weaving cast on over 10 (20, 30) sts. Knit to RC20 (40, 60) changing to contrast colour halfway through if desired. Thread the yarn tail through the sts to remove them.
Nose:
•RC000. Weaving cast on over 26 (52, 78) sts. Knit to RC12 (24, 36) in contrast if desired. Thread the yarn tail through the sts.
Finishing:
• Leave the woven strands free. Mattress stitch the legs, gathering the cast off sts to close the feet. Leaving an opening on one side, stitch up the sides, along the arms, sewing a curve along the straight rows of each arm, and stuffing each section as you go. Finish stuffing and close the opening.
• Pull the woven strand on the top of the head to gather slightly into a round shape. Knot the ends and sew in.
• Pull the woven strands at the neck to gather and tie around the neck to shape.
• Ears: fold in half lengthways and seam the sides. Gather the edges and sew together to form rounded tops. Sew the folded edge to the head securely.
• Nose: fold in half widthways and seam. Gather one edge together and stuff. Gather the other edge just slightly to form a rounded shape and sew to the head securely.
• Embroider or paint the nose, mouth and eyes. Do not glue or sew on anything that a small child could pull off and choke on. Sample has button eyes which would be unsafe for a small child but he is being cared for by an Alzheimer patient who gave him his name.
© Eileen Montgomery 2002
|
|